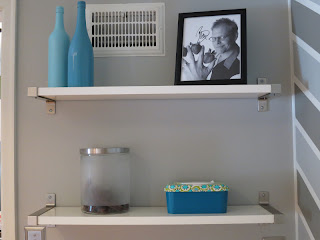
Introducing the first of my IKEA finds that I have
incorporated into our house…EKBY.
Technically, I bought two EKBYs. For those of you unfamiliar with IKEA they
are known for giving their products odd Scandinavian names that you can’t
remember or pronounce. It just makes
shopping there all the more fun.
So where did EKBY 1 and EKBY 2 end up? Well I’ll confess that this was one of the
few things at IKEA that I had in mind to purchase for our kitchen. Let's review where we left off. The last time most of you saw the space it
looked a little something like this.
Since then I brought up a spare cabinet from the basement,
and also purchased a slab of butcher block off of Craigslist for $60. I really lucked out with finding this butcher
block. It originally looked a little
rough with a “torn” corner, but the dimensions were the exact width and depth
that I needed to create an additional work space in the kitchen.
I sanded everything down and rounded the rough corner so it
now looks a little something like this.
It still needs several coats of oil & finish,
a product specifically made for butcher block, but I haven’t gotten around to
that yet. I also have a pile of lumber
in the garage waiting to be assembled into the other half of the kitchen
“island”. I say “island” since it is not
technically floating, but it’s also not a peninsula so I’m at a loss for names
(suggestions?). For now, the microwave
cart is filling in as support for the butcher block and it just happens to be
the perfect height.
The gray wall looked a little bare, and the off-centered
vent was well, a little off-putting.
I thought some wall shelves would fit the bill, and I knew
there would be plenty to choose from at IKEA.
What attracted me to EKBY was the combination of the sleek white shelf
with the stainless steel end caps. To
install the shelf I enlisted the following tools along with my step stool.
I decided that I wanted the shelves spaced between 15 to 16
inches apart. I also measured the width
between the door frame and the corner of the wall and determined I needed about
4 inches on either side of the shelves to center them on the wall. After determining the placement I marked the
holes for the first bracket, drilled the holes, and placed the wall anchors for
the screws. I found it easiest to attach
one bracket, insert the shelf, add the second bracket, and using the level mark
the position of the second bracket on the wall.
I’d like to add that I managed to do this alone, not to make Jason feel
bad, but to encourage others to take on projects of their own on their own. Yes women out there, you can hang a shelf (or
picture frame) without the assistance of your man. I think it’s silly when I see women on TV say
“honey, can you hang this picture for me?”
Really?
Anyways, here are EKBY 1 and 2 in all their glory…
I feel like the EKBY twins helped warm up the
wall and keep it from feeling too sterile.
The vent is still present and functional but less obvious with the
selective styling around it. I also like having Winston's treats and wipes off of the work surface. And yes I did
meet Alton Brown once, back in college at Nebraska Furniture Mart. He is awesome and deserves a shrine in our
kitchen, but I guess one photo will do for now.
Next on the list for the kitchen…
1. Applying oil finish to butcher block top.
2. Assembling under-cabinet shelving to create a more
“built-in” look for the “island”.
3. Priming and painting said “island” (along with the rest of
the cabinets and trim).
4. Adding hardware to cabinets.
I’m sure there’s more but let’s not get carried away. Thanks for stopping in, hope to be back with more updates soon!


No comments:
Post a Comment