Sometimes it’s the little things in life that bring a smile to your face…like an organized closet. This past year I have been working on becoming more organized around the house, you know, “a place for everything and everything in its place” sort of thing. It’s still a work in progress, but progress we have made!
The first closet project was our “master” bedroom closet. In a 1941 house, there really is no “master” bedroom, or closet for that matter. We have a bedroom, and a closet...a very, very small closet for modern day standards. But we’ve made it work. Here is what we started with.


Not only is it small, but the door is not centered on the closet making it impossible to reach anything on the left side. As this was not very user friendly, I started planning the redesign of our master closet early last year. This was the design and presentation I gave to Jason to convince him that we needed to make better use of our space.
OVERALL PRODUCT LIST
1 – 12”x45” Slider Shelf Cost 12”x12’ Slider Shelf = $29.98
1 – 12”x8.5” Slider Shelf
1 – 12”x24” Slider Shelf
1 – 12” Corner Slider Shelf Cost 12” Slider Shelf = $20.98
4 – 16”x18” Mesh Shelf Cost 16”x6’ Tight Mesh Shelf = $15.94
8 – 16” Bracket Cost 16” Bracket = $6.27 x 8 = $50.16
6 – 12” Bracket Cost 12” Bracket = $4.57 x 6 = $27.42
1 – 70” Fast Track Cost 70” Fast Track = $9.86
1 – 47.5” Fast Track Cost 47.5” Fast Track = $8.32
Other Mounting Supplies Approximately $30
Total Cost = $192.66
FRONT VIEW

SIDE VIEW
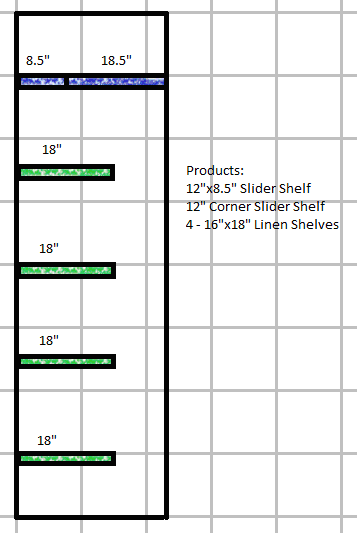
TOP VIEW

So while this started out as the approved plan…it changed. Once I cleared the closet and was able to walk around in it, I started rethinking the arrangement.


Before installing any new shelves or racks I had to so some demo along with some serious spackling.


After a day of demo, spackling, caulking and sanding, and another day of painting, we were left with a nice blank canvas.


It was much easier now to see my new plan that was in my mind. I decided to do two rows of hanging shelves on the left, and five shelves along the wall in front of the door.


Here is what it looks like today with an inexpensive mirror attached to the door with Command Strips, a few hooks for belts and scarves, and new wood hangers (on clearance at IKEA last summer, I think it was $1.99 for a pack of 8?).


We’ve had it installed now for almost a year, and it’s been really great for our needs. It’s still lacking a few things…there’s not a lot of room for long hanging items (my dresses) but since these are used so infrequently I store them in the guest room closet. The limited hanging space does help us to thin out our closet and make regular donations of those items that we no longer wear. Shoe storage is also an issue, but we do have baskets that slide under the bed to hide some of the overflow.
The next closet tackled was the linen closet in our hallway. It was plain, and kind of ugly.
(Imagine the shelves filled with random toiletries, towels, and cleaning supplies strewn about)


But now I actually smile when I open the door.


This project went a little quicker than the master. I simply painted the inside of the closet the same color gray as the hallway, and painted the shelves with a nice yellow-gold color. The bins were bought at Bed Bath & Beyond. I made labels for each bin mounted on fun scrapbook paper which were then taped onto the bins. This project only took a few evenings to complete, mostly to let the paint dry fully; otherwise it easily could be done in one day.
After the success of this project I definitely knew I wanted to do something with the kitchen pantry. While the herringbone painting project was going on I also took on the pantry as a little side project. Here is what it looked like before. (Again, imagine all of the shelves full of food.)

Like the linen closet, I took out all of the shelves and painted the inside. I wanted a nice pop of color in the kitchen so I chose a muted turquoise called “Yucca Plant” from Martha Stewart’s line at Home Depot. The shelves were painted the same color gray as the walls in the kitchen.


Here is the pantry restocked. I used two metal shelves from IKEA to make better use of the vertical space for cans.


I know some people will say, “Who cares if your closets look pretty? No one will ever see them.”
There is something about being not only organized, but having a secret splash of color that makes you very happy, calm, and comforted when you open that door. So go buy yourself a quart of your favorite paint color, a few baskets and start organizing! It is a huge stress reliever and very simple to do.