
Early this morning I couldn’t sleep. I kept waking up before the alarm went off. 2:02am, 3:34am, 4:10am, 6:05am. Finally the alarm went off and Jason got up to get ready for work. I, trying to sleep in on my unexpected day off, lay in bed for another 45 minutes but just couldn’t get back to sleep. My mind was racing…with thoughts of penny tile.
I have been dreaming of the day I would have a penny tile back splash for a long time. The last two years I have been scouring the internet for kitchen remodeling ideas, and last year on Overstock.com I came across some very affordable mosaic tile. It was the first time I had seen penny tile. Not only did I like the price ($6-$7 a square foot), I liked how it had a slightly vintage feel to it to go with our 1941 house.
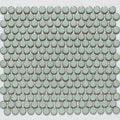
http://www.overstock.com/Home-Garden/SomerTile-12.25x12-in-Penny-3-4-in-Lite-Green-Porcelain-Mosaic-Tile-Pack-of-10/4564996/product.html
So I kept coming back to this light green penny tile time after time. But it wasn’t exactly what I was looking for. I like the idea of color in a back splash, but considering how often I change color palates and paint walls in the other rooms of my house, I became kind of color-shy when it came to a back splash. I couldn’t commit to color.
I have found for most rooms in our house (except the dining room) that a neutral backdrop with brightly colored accessories is the way to go. This allows me to change pillows, art work, and accessories quite easily without having to change major pieces of furniture or the wall color whenever I get a new throw pillow. I wanted this same concept in the kitchen.
For many months I continued to look for different types of mosaic tile, found a few others that I was interested in but the price just didn’t compare with the penny tile. There was white penny tile, but I wanted white cabinets and knew this would be too much white.
And then, miracle of miracles happened. John and Sherry found my penny tile.
Many of you probably know who I am referring to, bloggers extraordinaire John and Sherry Petersik of Young House Love. They basically have my dream life job, staying at home doing DIY projects and blogging about them. Anyways, I could go on and on about how amazing their blog is, but you should check it out for yourself.
Let’s get back to the penny tile. October 18th was a very special day last year. Yes, it was Jason’s birthday, but it was also the day that John and Sherry posted about the tile they had found for their kitchen…GRAY penny tile. I knew right then and there, that this was my tile.
I had looked at The Tile Shop’s website previously and saw that they had penny tile, but the color was called “moss” so I assumed it was greenish. Thanks to YHL they pointed out that this was actually a light gray color, exactly the neutral backdrop that I was looking for in our kitchen. The price was also perfect, $5.59 a square foot.

Before Christmas I received an incredible email coupon from The Tile Shop for $50 off $100 purchase. We were counter-top shopping at the time, so I figured this was a good time to take the plunge and get the tile. With the coupon I ended up spending only $76.80 on the tile. So the box of pretty penny tile has been sitting in our basement waiting for today…installation day! Yes this is why I couldn’t sleep this morning, because I was excited to spend my day installing tile.
Last night I went to pick up supplies for installation at The Tile Shop ($121 after using the 10% off YHL discount) as well as The Home Depot ($17). Isn’t it crazy that it cost more for the supplies than the tile? I bought mastic, a trowel, tile snips, a grout float, grout, grout add-mix, grout sealer, caulk, sponges and a roll of plastic that I taped over the granite to help protect it from the mastic. The Tile Shop was great at helping me find all of the tools and supplies that I needed.
At 9:30am I started with the actual install after an hour of clearing out and prepping the kitchen. Jason suggested that I start behind the stove to get the hang of it. With a level I drew a line extending from the counter to make sure the tile was level.

Then, following YHL’s excellent and very detailed instructions I started laying tile. (Please refer to their website for specifics about how to install penny tile, they are very thorough!) I’m lucky in that John and Sherry just tackled this project last week, and they posted all about the tips and tricks that got them through their tile job. I used the taping method to snip the tile and it worked like a charm!

Originally I had thought about using a product called Bondera in place of thin-set or mastic, but after reading comments on YHL and other sites it seemed that there was an advantage to the thinset/mastic since you could move the tiles more easily after applying them to achieve an even pattern. I thought I was going to have to mix up thin-set for this project, but the guy at The Tile Shop said I could use pre-mixed mastic, which I have a feeling saved me a lot of time in the long run.


It took me until 6:00pm tonight to put up the last tile. I thought I was going to have to make another trip to The Tile Shop for another sheet of tile, but I had just the right amount. This is all I am left with.

This was another very long, very tiring process, but unlike taking down the old tile and putting up the cement board…it was actually fun! I warned Jason that I may have a new household obsession to go along with painting and throw pillows. Here is what our kitchen looks like now.


I still have to grout, probably this weekend, since it has to dry for at least a day. If you want to see what the finished product will look like check out YHL’s post today, they just grouted. I promise I normally don’t copy their projects immediately after they complete them (would be kind of creepy). It just happened that they stars aligned and they knocked out their tile project just as I was getting started on ours.
In conclusion, I love, love, love the penny tile. Honestly, it wasn’t as terrible to install as everyone says. I cannot wait until it’s grouted and I cannot wait to start painting the walls and cabinets! Stay tuned for completed back splash update.
love it, charlotte! can't wait to see it with grout and white cabinets - and i can't believe what a steal you got the tile for. i hope you submit your final kitchen reno to YHL reader submissions! and i hope you have a new kitchen PARTY so i can see this gorgeous tile in person :)
ReplyDeleteI love penny tile! It looks great. I don't think you're a YHL creeper. ;)
ReplyDeleteWow, it looks great! You are kind of a rock star.
ReplyDelete